There’s a specific kind of excitement that hits when you see your own app running on an actual phone for the first time. Not in an emulator. On a real device, in your hand. If you’ve been trying to figure out Wireless Debugging Android and everything looks confusing or broken, you’re not alone. This guide walks you through everything from scratch — no USB cable needed, no complicated setup.
Why Run Your App on a Real Phone at All?
Emulators are useful. Nobody’s saying they aren’t. But they lie to you sometimes.
Performance on a real device is different. Sensors like the accelerometer, camera, and GPS behave completely differently on a physical phone. Touch response, battery usage, screen rendering — none of that is accurately replicated inside an emulator.
If you’re building anything serious, even a simple app for a friend or your own project, testing on a real Android phone is something you should do early, not at the end.
What Is Wireless Debugging on Android?
Before Android 11, developers almost always had to plug in a USB cable to connect their phone to Android Studio. It worked fine, but cables are annoying, ports wear out, and it’s not ideal when you’re moving around.
Wireless Debugging Android is a built-in feature (introduced fully in Android 11 and improved in later versions) that lets your phone connect to Android Studio over your local Wi-Fi network. No USB cable required after the very first pairing step.
By 2026, this feature has become much more stable and reliable than it was when it first launched. Most mid-range and flagship phones handle it well.
What You Need Before Starting
This isn’t a long list, but every item matters.
- An Android phone running Android 11 or higher (Android 12+ is better for wireless debugging)
- Android Studio installed on your computer (Hedgehog or newer recommended)
- Both your phone and computer connected to the same Wi-Fi network
- A working Android project (even a blank “Hello World” app is fine)
If you’re on Android 10 or below, wireless debugging won’t be available natively. You can still use ADB over TCP/IP but that’s a more manual process covered separately.
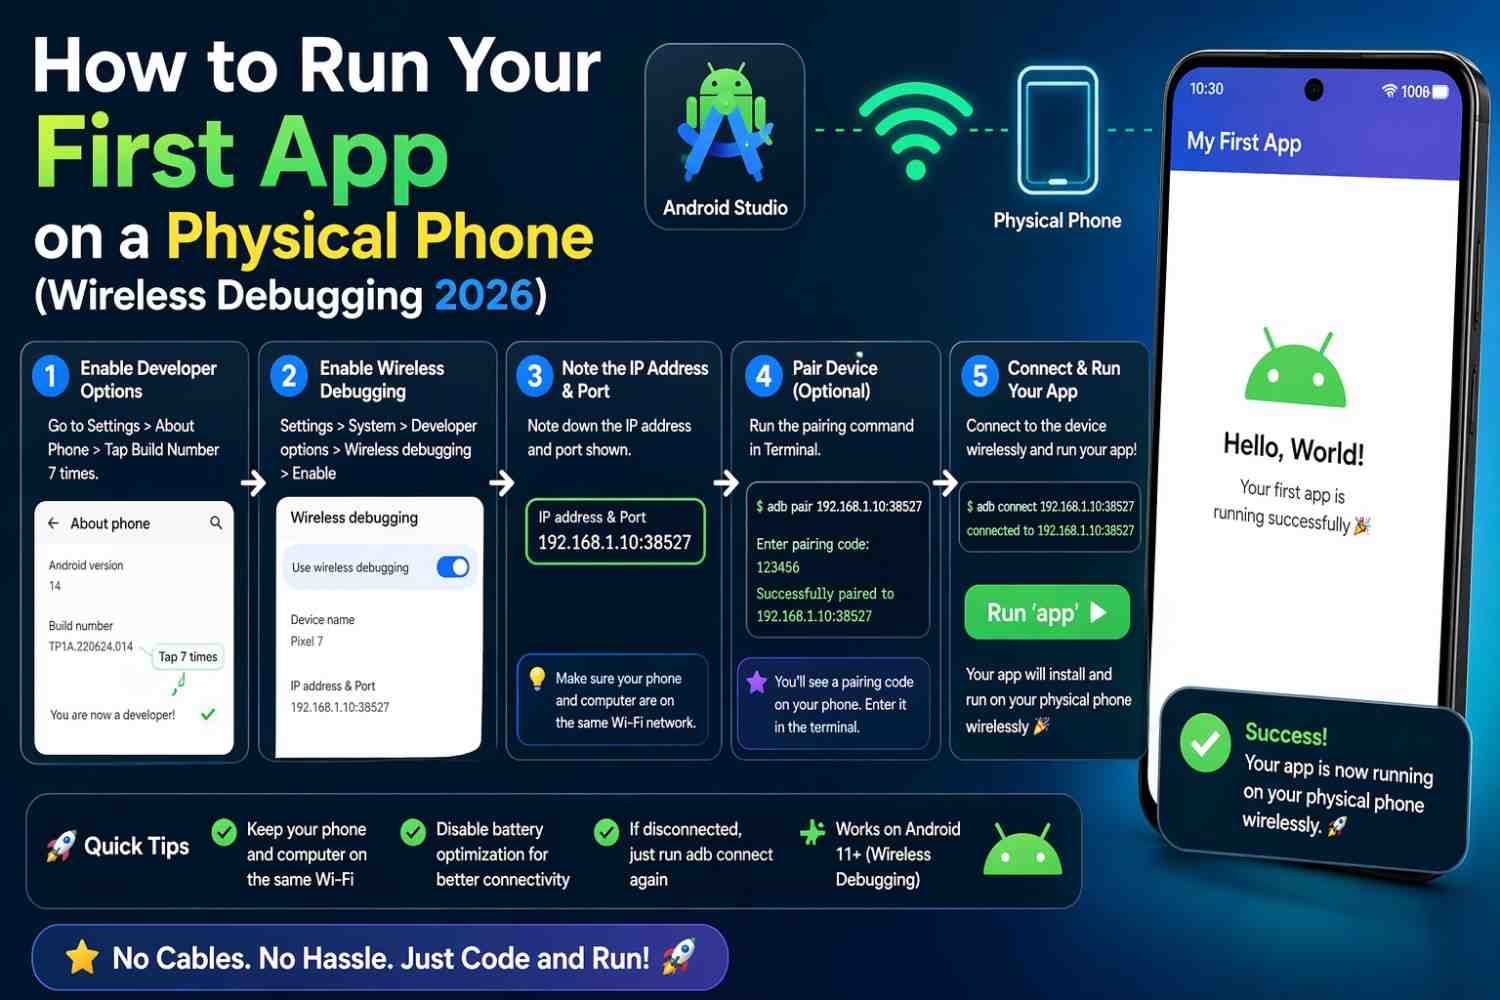
Step 1: Enable Developer Options on Your Android Phone
This is where most beginners get stuck, because the option isn’t visible by default.
Open your phone’s Settings, then scroll down to About Phone. Look for Build Number. Tap it seven times in a row. You’ll see a countdown message and then a confirmation that Developer Options have been enabled.
Now go back to Settings > System > Developer Options (on some phones it’s directly in Settings). This is where Wireless Debugging Android lives.
The exact path varies by manufacturer. On Samsung phones, it’s often under Settings > About Phone > Software Information > Build Number. On OnePlus, it’s in Settings > About Device. The logic is the same everywhere.
Step 2: Turn On Wireless Debugging
Inside Developer Options, scroll until you find Wireless Debugging. Toggle it on.
Your phone will show a small popup asking if you want to allow wireless debugging on this network. Tap Allow.
Once enabled, you’ll see two important things on the screen:
- An IP address and port (something like
192.168.1.5:37869) - A Pair using pairing code option
Keep this screen open. You’ll need it in the next step.
Step 3: Pair Your Phone With Android Studio
Open Android Studio on your computer. If you have a project open, look at the top toolbar where you normally select your device. Click on it and choose Pair Devices Using Wi-Fi.
A window will open with two options. Choose Pair device with pairing code.
Now on your phone, tap Pair device with pairing code inside the Wireless Debugging screen. Your phone will show a 6-digit pairing code and a different IP/port than before — this one is specifically for pairing.
Enter that IP, port, and pairing code into Android Studio. If everything’s on the same network, it should pair within a few seconds. You’ll see your phone appear in the device list.
This is Wireless Debugging Android working in real-time. Pretty satisfying, honestly.
Step 4: Run Your App on the Physical Phone
Now the straightforward part.
In Android Studio, select your paired phone from the device dropdown. Hit the green Run button (or press Shift + F10 on Windows/Linux, Control + R on Mac).
Android Studio will build your app, install it on your phone wirelessly, and launch it automatically. You’ll see your app open on the physical device just like that.
First time you do this, it genuinely feels a bit magical.
Common Problems and How to Fix Them
Phone Doesn’t Appear in Android Studio
Make sure both devices are on the same Wi-Fi network. If you’re on a 5GHz band on your laptop and a 2.4GHz band on your phone (which happens more than you’d think), they might technically be on the same router but isolated from each other. Switch both to the same band.
Also, some corporate or university networks block device-to-device communication. In that case, try a personal hotspot from your phone and connect your laptop to it.
Pairing Code Not Working
The pairing code expires quickly. Don’t wait too long between seeing it on your phone and entering it in Android Studio. If it times out, just tap the pairing option again on your phone to get a fresh code.
Connection Drops After a While
Wireless Debugging Android doesn’t always stay connected indefinitely, especially if your phone’s screen locks or the app goes to background. Go back to Developer Options, make sure Wireless Debugging is still on, and re-connect from Android Studio if needed.
You can also keep your phone’s screen on during development — there’s a Stay Awake toggle in Developer Options that’s useful exactly for this.
How Wireless Debugging Changed in 2025–2026
Google has been refining this feature gradually. In recent Android Studio versions, the pairing process is noticeably smoother. The connection is faster, the initial pairing dialog is cleaner, and Android Studio remembers previously paired devices better than before.
If you tried Wireless Debugging Android back in 2022 and gave up because it was flaky, it’s worth trying again. The experience is genuinely better now.
The official documentation at Android Developers: Run apps on a hardware device is kept up to date and worth bookmarking.
Tips for a Smoother Development Experience
A few things that make this easier once you’re set up:
Keep your phone plugged into a charger during development. Building and installing apps drains battery faster than normal use.
Use a phone you’re okay having test apps on. It doesn’t have to be your main device, but it should be one you can restart freely without losing important data.
Check your firewall settings on your computer. Sometimes Windows Firewall blocks the connection. If you’re getting timeouts, try temporarily disabling it to test, then add an exception if that fixes it.
For more reading on this, the Android Studio release notes often mention improvements to device connectivity that are worth following.
You might also find it useful to read about how ADB works internally if you want to understand what’s happening under the hood during wireless debugging.
Is Wireless Debugging Safe?
Reasonable question. When Wireless Debugging is on, your phone is technically accepting connections over the network. That said, it requires manual pairing first, and it only works while the toggle is enabled.
Don’t leave it permanently on when you’re not actively developing. Toggle it off when you’re done for the day. It’s a development tool, not something meant to run continuously.
Final Conclusion
Running your first app on a real Android phone is one of those small developer milestones that sticks with you. Wireless Debugging Android makes the whole process cleaner and more convenient than it used to be — no fumbling with cables, no worrying about USB connection modes.
The setup takes maybe ten minutes once. After that, you just open Android Studio, select your phone, and hit run. That’s it. If you follow the steps in this guide carefully, especially the pairing step, you should have your app running on a physical device within the same sitting.
It’s a practical skill worth getting right early. Emulators have their place, but developing with a real phone in hand gives you a much clearer picture of how your app will actually behave for users.