If you’ve already built a Hello World app and you’re wondering what to build next, a calculator app Android Studio project is the answer most experienced developers would give you. It’s more complex than Hello World, but focused enough to finish in a single session. It’s not too big to understand, and not too small to actually teach you anything useful.
What makes a calculator app Android Studio project genuinely valuable isn’t the calculator itself — it’s everything you have to understand to build it correctly. State management. User input handling. A ViewModel that holds business logic. A grid layout built with Compose. Custom button components with conditional styling. These are skills that transfer directly to every real Android app you’ll build afterward.
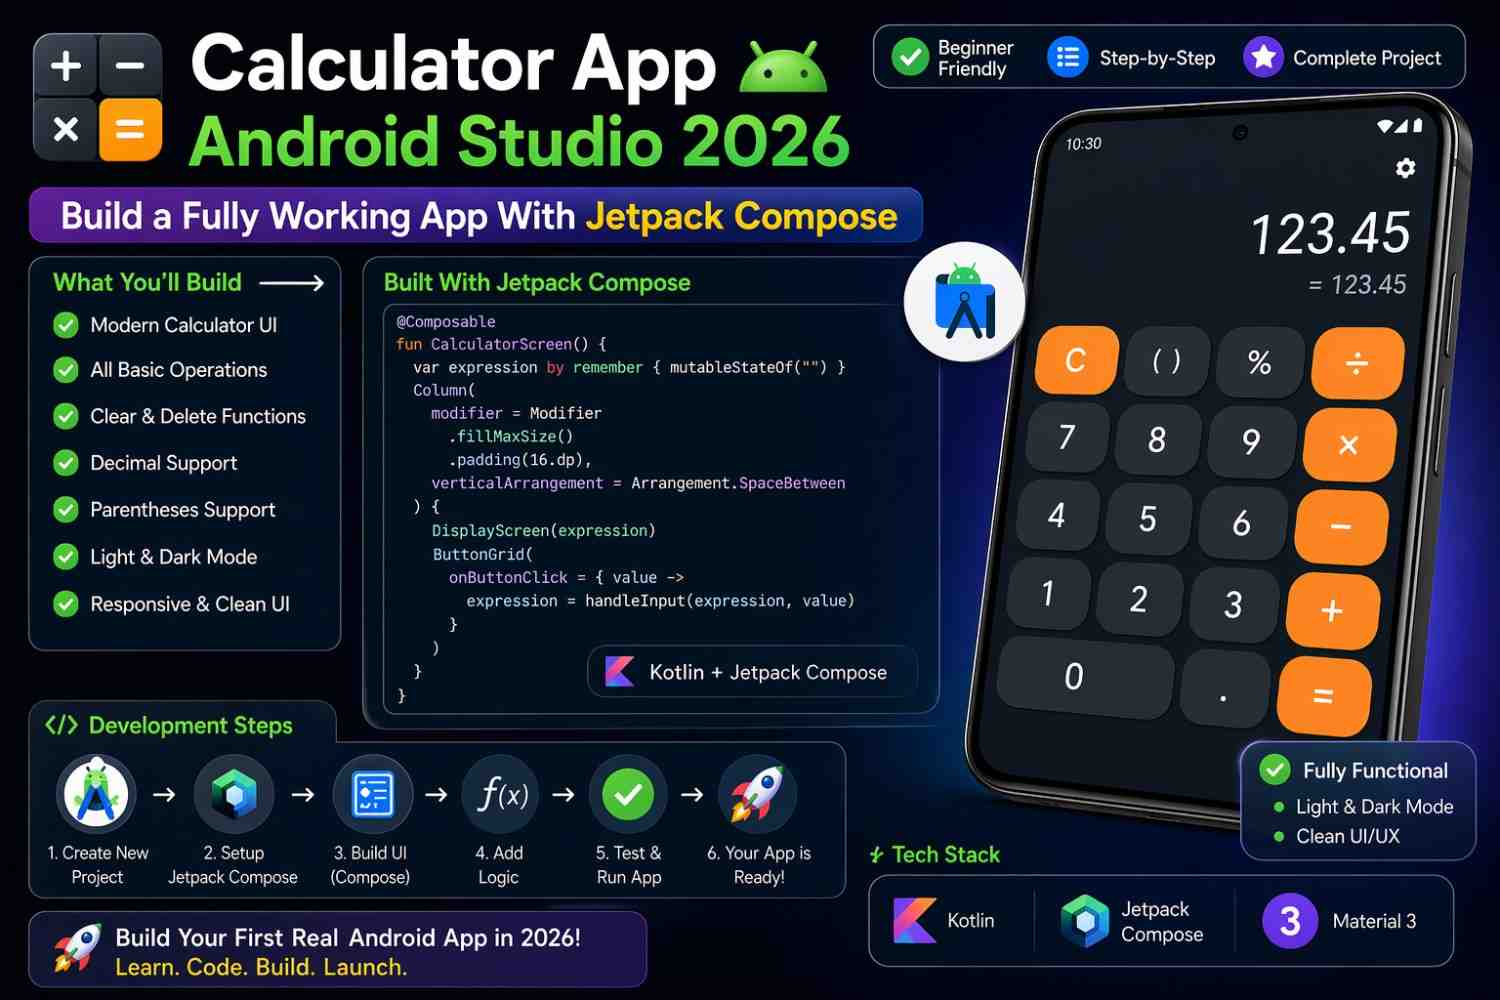
This guide builds a fully working calculator from scratch using Jetpack Compose and Kotlin, explaining every decision along the way.
What You’re Actually Building
A standard calculator with digit buttons (0–9), operation buttons (+, −, ×, ÷), a clear button, a decimal point button, and an equals button. The display shows the current input and result.
Nothing fancy — no scientific functions, no calculation history, no animations. Just a clean, functional calculator app Android Studio project that works correctly and teaches you the fundamentals properly.
Step 1: Create the Project
Open Android Studio, click New Project, and select Empty Activity. Fill in the details:
- Name: SimpleCalculator
- Package: com.yourname.calculator
- Language: Kotlin
- Minimum SDK: API 24
Click Finish and wait for the initial Gradle sync to complete before writing any code. Trying to write code while Gradle is still syncing causes confusing errors that have nothing to do with your code.
Step 2: Plan the State Before Writing UI
This step is one that beginners frequently skip — and then struggle later because they didn’t think through what data their app actually needs to track.
Before writing any UI code for your calculator app Android Studio project, think about what a calculator needs to know at any given moment. It needs the number currently on the display. It needs to remember the first number after an operation button is pressed. It needs to know which operation was selected. And it needs to know whether the next digit press should start a fresh number or append to the current one.
That thinking leads directly to this state class:
kotlin
data class CalculatorState(
    val displayValue: String = "0",
    val firstOperand: Double? = null,
    val pendingOperation: String? = null,
    val shouldResetDisplay: Boolean = false
)
displayValue is what appears on screen. firstOperand stores the first number after an operation is chosen. pendingOperation holds the +, −, ×, or ÷ the user selected. shouldResetDisplay tells the calculator whether the next digit press should start a new number or continue building the current one.
This single data class represents the complete state of your calculator app Android Studio project at any moment.
Step 3: Build the ViewModel
Keeping Logic Separate From the UI
Create a new file called CalculatorViewModel.kt. The ViewModel holds all the calculator logic — keeping it completely separate from the Composable UI code. This separation is one of the most important habits to build early in Android development.
kotlin
import androidx.lifecycle.ViewModel
import kotlinx.coroutines.flow.MutableStateFlow
import kotlinx.coroutines.flow.StateFlow
import kotlinx.coroutines.flow.asStateFlow
import kotlinx.coroutines.flow.update

class CalculatorViewModel : ViewModel() {

    private val _state = MutableStateFlow(CalculatorState())
    val state: StateFlow<CalculatorState> = _state.asStateFlow()

    fun onDigitPressed(digit: String) {
        _state.update { current ->
            if (current.shouldResetDisplay) {
                current.copy(displayValue = digit, shouldResetDisplay = false)
            } else {
                val newDisplay = if (current.displayValue == "0") digit
                    else current.displayValue + digit
                current.copy(displayValue = newDisplay)
            }
        }
    }

    fun onDecimalPressed() {
        _state.update { current ->
            if (!current.displayValue.contains(".")) {
                current.copy(displayValue = current.displayValue + ".")
            } else current
        }
    }

    fun onOperationPressed(operation: String) {
        _state.update { current ->
            val currentValue = current.displayValue.toDoubleOrNull()
                ?: return@update current
            current.copy(
                firstOperand = currentValue,
                pendingOperation = operation,
                shouldResetDisplay = true
            )
        }
    }

    fun onEqualsPressed() {
        _state.update { current ->
            val first = current.firstOperand ?: return@update current
            val second = current.displayValue.toDoubleOrNull()
                ?: return@update current

            val result = when (current.pendingOperation) {
                "+" -> first + second
                "-" -> first - second
                "×" -> first * second
                "÷" -> if (second != 0.0) first / second else Double.NaN
                else -> return@update current
            }

            val resultString = if (result == result.toLong().toDouble()) {
                result.toLong().toString()
            } else {
                result.toString()
            }

            current.copy(
                displayValue = resultString,
                firstOperand = null,
                pendingOperation = null,
                shouldResetDisplay = true
            )
        }
    }

    fun onClearPressed() {
        _state.value = CalculatorState()
    }
}
Walk through each function carefully — this is the brain of your calculator app Android Studio project.
onDigitPressed either starts a fresh number if shouldResetDisplay is true, or appends the digit to what’s already on the display. It also handles the edge case where the current display is “0” — replacing it with the digit rather than producing “07” or similar.
onDecimalPressed adds a decimal point only if one doesn’t already exist. Without this check, users could produce “3..5” which would crash the number parsing.
onOperationPressed saves the current display value as firstOperand, stores the selected operation, and sets shouldResetDisplay to true so the next digit press starts a fresh number.
onEqualsPressed performs the actual calculation. The result.toLong().toString() check is worth understanding specifically — without it, 2 + 2 displays as “4.0” instead of “4”. Converting to Long removes the unnecessary decimal for whole number results.
onClearPressed simply resets everything back to the initial CalculatorState — the cleanest possible reset.
Step 4: Build the Calculator UI
Creating the Screen Layout
Create a new file called CalculatorScreen.kt. This is where the visual layout of your calculator app Android Studio project lives:
kotlin
@Composable
fun CalculatorScreen(viewModel: CalculatorViewModel = viewModel()) {
    val state by viewModel.state.collectAsState()

    Column(
        modifier = Modifier
            .fillMaxSize()
            .background(Color(0xFF1C1C1E))
            .padding(8.dp),
        verticalArrangement = Arrangement.Bottom
    ) {
        Text(
            text = state.displayValue,
            color = Color.White,
            fontSize = 64.sp,
            textAlign = TextAlign.End,
            maxLines = 1,
            modifier = Modifier
                .fillMaxWidth()
                .padding(horizontal = 16.dp, vertical = 24.dp)
        )

        val buttons = listOf(
            listOf("C", "±", "%", "÷"),
            listOf("7", "8", "9", "×"),
            listOf("4", "5", "6", "-"),
            listOf("1", "2", "3", "+"),
            listOf("0", ".", "=")
        )

        buttons.forEach { row ->
            Row(
                modifier = Modifier.fillMaxWidth(),
                horizontalArrangement = Arrangement.spacedBy(8.dp)
            ) {
                row.forEach { label ->
                    CalculatorButton(
                        label = label,
                        modifier = Modifier.weight(
                            if (label == "0") 2f else 1f
                        ),
                        onClick = {
                            when {
                                label.all { it.isDigit() } ->
                                    viewModel.onDigitPressed(label)
                                label == "." -> viewModel.onDecimalPressed()
                                label == "=" -> viewModel.onEqualsPressed()
                                label == "C" -> viewModel.onClearPressed()
                                label in listOf("+", "-", "×", "÷") ->
                                    viewModel.onOperationPressed(label)
                            }
                        }
                    )
                }
            }
            Spacer(modifier = Modifier.height(8.dp))
        }
    }
}
The button grid uses a nested list of lists — each inner list represents one row of buttons. This is a clean pattern for grid layouts in Compose without needing a full LazyVerticalGrid.
Modifier.weight(if (label == "0") 2f else 1f) gives the “0” button double the width of every other button — matching how real calculators look. The verticalArrangement = Arrangement.Bottom pushes the entire layout to the bottom of the screen, keeping the display at the top and buttons clustered at the bottom where thumbs naturally reach.
Building the Calculator Button Component
kotlin
@Composable
fun CalculatorButton(
    label: String,
    modifier: Modifier = Modifier,
    onClick: () -> Unit
) {
    val backgroundColor = when (label) {
        "C", "±", "%" -> Color(0xFF636366)
        "+", "-", "×", "÷", "=" -> Color(0xFFFF9F0A)
        else -> Color(0xFF2C2C2E)
    }

    Box(
        contentAlignment = Alignment.Center,
        modifier = modifier
            .height(80.dp)
            .clip(CircleShape)
            .background(backgroundColor)
            .clickable(onClick = onClick)
    ) {
        Text(
            text = label,
            color = Color.White,
            fontSize = 28.sp,
            fontWeight = FontWeight.Medium
        )
    }
}
The color logic is straightforward and worth understanding — utility buttons (C, ±, %) get medium gray, operation buttons and equals get orange, and digit buttons get dark gray. This three-color scheme makes the calculator app Android Studio UI immediately readable without any design experience required.
CircleShape with clip() gives each button its rounded appearance. height(80.dp) keeps buttons large enough to tap comfortably on a real device.
Step 5: Connect Everything in MainActivity
kotlin
class MainActivity : ComponentActivity() {
    override fun onCreate(savedInstanceState: Bundle?) {
        super.onCreate(savedInstanceState)
        setContent {
            SimpleCalculatorTheme {
                CalculatorScreen()
            }
        }
    }
}
That’s the complete connection. CalculatorScreen handles its own ViewModel internally through viewModel(), so MainActivity stays clean and minimal. Press Run — you should see a dark calculator screen with properly laid out, tappable buttons.
Step 6: Test Every Edge Case
Don’t Skip This Step
A calculator app Android Studio project that crashes on edge cases isn’t really done. Test these specific scenarios before calling it finished.
Division by zero: Tap 5 ÷ 0 =. The current code returns Double.NaN which displays as “NaN.” If you prefer something more user-friendly, find the NaN case in onEqualsPressed and return “Error” as the display string instead.
Multiple decimal points: Tap 3 . . 5. Only one decimal point should appear — the onDecimalPressed guard handles this, but verify it works as expected.
Long results: Tap 99999999 × 99999999 =. Confirm the result displays without crashing and fits within the single-line Text component.
Operation chaining: Tap 5 + 3 × 2 =. Your calculator computes left to right — 8 × 2 = 16 — rather than following mathematical precedence. This is completely standard behavior for basic calculators and doesn’t need fixing.
For deeper guidance on testing Android apps properly, the official Android testing documentation is worth bookmarking as your projects grow more complex.
What You Actually Learned Building This
This single calculator app Android Studio project touched nearly every core Android development concept that matters.
State management with MutableStateFlow and StateFlow. A ViewModel that holds all UI logic completely separate from the Composable. collectAsState() connecting ViewModel data to the UI automatically. Custom Composable components with parameters and conditional styling. Grid layouts built with nested Row components. Business logic written in pure Kotlin functions that are easy to read and test.
That’s not a small list. That set of skills represents the majority of what you’ll use in every Android app you build from this point forward. The Android architecture guide explains how these pieces fit into larger app structures — worth reading after you finish this project.
What to Build Next
After your calculator app Android Studio project is working, the natural next step is adding a calculation history feature. Store the last ten calculations in a list and display them somewhere on the screen.
That single addition introduces LazyColumn for scrollable lists, list state management, and eventually local data persistence — the next tier of Android development skills, all accessible through one focused extension of something you’ve already built.
Final Conclusion
A calculator app Android Studio project is modest in ambition but genuinely rich in learning value. Building it from scratch — thinking through the state model, writing the ViewModel logic, designing the Compose layout, and testing the edge cases — gives you a real foundation that Hello World simply can’t provide.
Every concept you practiced here — state, ViewModel, Composable components, conditional logic — appears in every Android app you’ll ever build. The calculator is just the vehicle. What you actually built is the foundation of your Android development skillset. Keep it, extend it, and use it as a reference when the same patterns appear in your next project.