Opening Android Studio for the very first time is a bit overwhelming. There are menus everywhere, options you don’t recognize, and before you’ve written a single line of code, you’re already being asked to make decisions you don’t fully understand yet. One of the earliest — and most important — of those decisions is choosing a project template.
Android Studio project templates are pre-built starting points that give your app a basic structure before you begin. They set up your files, connect your layouts, and in some cases add navigation or UI components that would otherwise take hours to configure from scratch. Choosing the right one early saves a lot of confusion later.
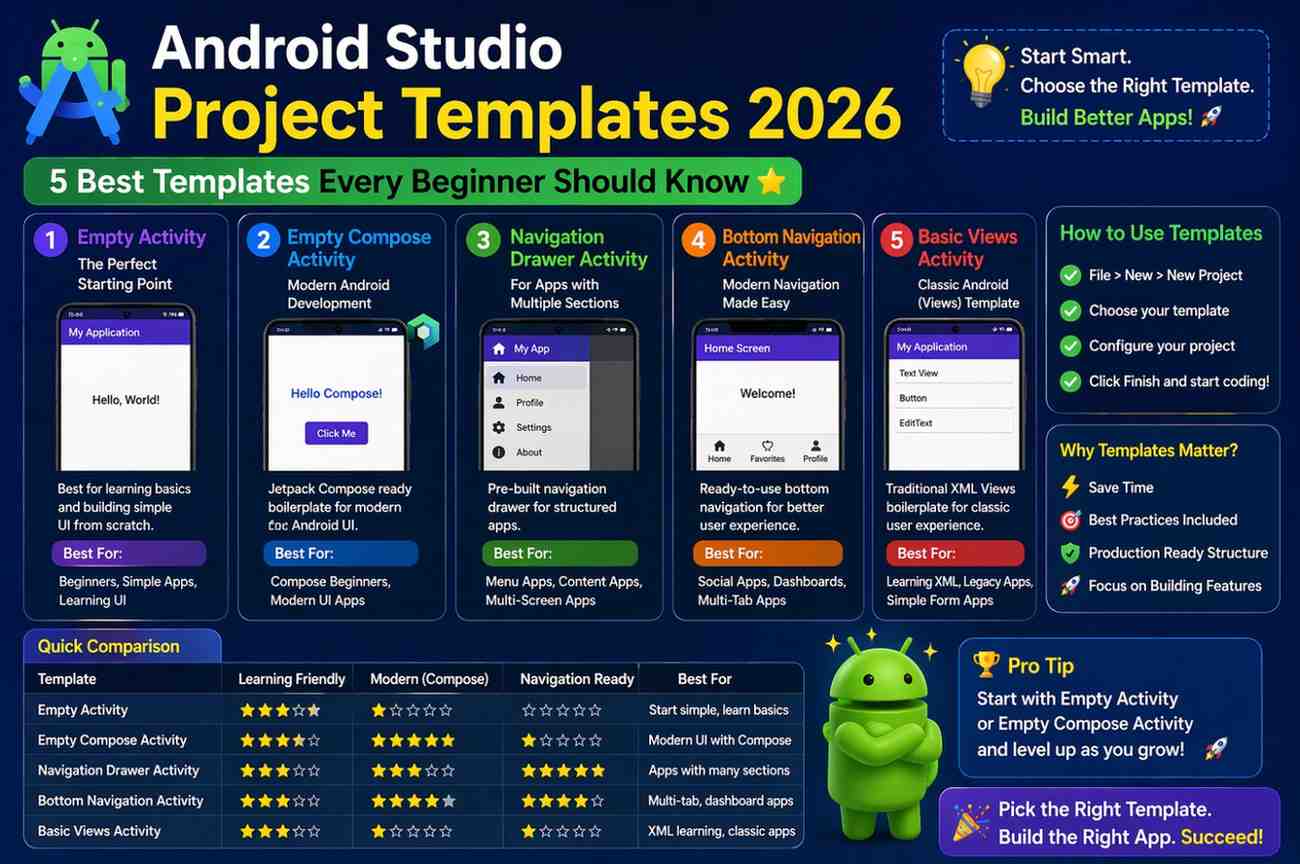
This guide covers five Android Studio project templates that are genuinely useful for beginners in 2026 — what each one includes, when to use it, and what you’ll learn from it.
Why Android Studio Project Templates Actually Matter
When you create a new project in Android Studio, the template selection screen appears before anything else. A lot of beginners either skip past it quickly or pick something randomly — and then spend the next hour wondering why their project looks nothing like the tutorial they’re following.
A well-chosen template does three things for you. It sets up a proper project structure so your files are organized correctly from the start. It includes basic UI elements so you’re not starting from a completely blank screen. And it gives you a working example of how Android app components connect together — which is genuinely educational when you’re just starting out.
Think of Android Studio project templates the way you’d think of a house blueprint. The foundation and walls are already placed. Your job is to customize what goes inside.
1. Empty Activity Template – Best for Pure Learning
What It Is
The Empty Activity template is the most minimal option available. It creates a single screen with the bare minimum code — one Activity file, one basic layout file, and nothing else. No toolbar, no buttons, no navigation. Just a blank starting point.
Why Beginners Should Start Here
This is the template that teaches you the most, precisely because it gives you the least. When Android Studio doesn’t generate extra code for you, you have to understand what you’re adding and why. That understanding is exactly what beginners need to build.
Among all Android Studio project templates, Empty Activity is the one that forces you to actually learn — rather than just work around generated code you don’t understand.
You get a single MainActivity.kt file, a basic activity_main.xml layout, and full control over everything that comes next. Want a button? You add it. Want a click handler? You write it. Want to change the background color? You figure out how. Each of those small tasks teaches something real.
Real-Life Example
You want to build a simple calculator app or a basic “Hello World” screen. Empty Activity is exactly enough. There’s no unnecessary complexity to navigate around, and every line of code in the project is something you either wrote or deliberately chose to add.
When to Move On From It
Once you understand how Activities, layouts, and basic UI interactions work, Empty Activity starts to feel limiting. That’s the right time to explore the next template on this list.
2. Basic Activity Template – The Balanced Starting Point
What It Is
The Basic Activity template is one step up from Empty Activity. It adds a toolbar at the top of the screen and a floating action button — the circular button that typically sits in the bottom-right corner of many Android apps.
Why It’s Useful for Beginners
This template gives your app an immediate “real app” feel without introducing complexity you’re not ready for. The toolbar and floating action button are standard Android UI components that appear in countless production apps. Learning how they work early on is genuinely useful.
Among Android Studio project templates for beginners who’ve gotten comfortable with Empty Activity, Basic Activity is usually the natural next step. It introduces the concept of multiple layout files working together — the main layout and the content layout — which is a pattern worth understanding early.
Real-Life Example
Imagine you’re building a simple notes app. The floating action button is the perfect trigger for “add a new note.” The toolbar gives you a place for the app title and action menu items. The Basic Activity template gives you that structure immediately, so you can focus on the notes functionality rather than setting up the UI scaffolding from scratch.
What You’ll Actually Learn
How a toolbar is configured and connected to your Activity. How layout files reference each other. How a floating action button responds to clicks. These are practical, everyday Android UI skills — and Basic Activity introduces all of them in a manageable way.
3. Bottom Navigation Activity – For Multi-Screen Apps
What It Is
The Bottom Navigation Activity template creates an app with a navigation bar along the bottom of the screen — the kind you see in Instagram, YouTube, and most major Android apps. Tapping each icon in the bar switches to a different section of the app.
Why This Template Helps Beginners
Navigation between screens is one of the first places where Android development gets genuinely tricky. Many beginners struggle with it because it involves multiple concepts at once — Fragments, a NavController, a NavGraph, and a menu resource file — all working together.
This is one of the Android Studio project templates that does the hard setup work for you. The navigation graph is already configured. The Fragments are created and connected. The bottom bar is wired up and functional. You can run the template immediately and see working navigation before you’ve customized anything.
That working example is incredibly useful for learning. You can study how each piece connects rather than trying to build it all simultaneously from documentation.
Real-Life Example
You’re building a student app with a Home section, an Attendance section, and a Profile section. Or a simple shopping app with Products, Cart, and Account tabs. The Bottom Navigation template gives you exactly that structure — ready to customize with your own content.
A Realistic Note for Beginners
The generated code in this template is more complex than Empty or Basic Activity. Don’t let that discourage you. Focus on one thing at a time — first understand how tapping a tab loads a Fragment, then look at how the navigation graph defines the destinations. Understanding comes in layers, not all at once.
4. Navigation Drawer Activity – Side Menu Layout
What It Is
The Navigation Drawer Activity template creates an app with a slide-out side menu — the kind you open by tapping the hamburger icon (three horizontal lines) in the top-left corner or by swiping from the left edge of the screen.
Why It’s Worth Learning
Side menus appear in professional apps across almost every category. Settings panels, profile sections, category lists, account options — a navigation drawer is one of the most practical UI patterns in Android development. Learning it through one of the Android Studio project templates that implements it correctly is significantly easier than building it from scratch.
The template includes a pre-built drawer layout, a navigation menu resource file, and Fragment switching logic that responds to menu item taps. The structure is complete and working from the moment you create the project.
Real-Life Example
Think of any app where you open a side menu to access Settings, a Profile page, an About section, or Help. That’s exactly what this template builds. If your app idea has several sections that don’t fit neatly into bottom tabs, a navigation drawer is often the cleaner choice.
What You’ll Learn From It
How drawer layouts are structured in XML. How menu items are defined in a resource file. How tapping a menu item triggers Fragment loading. How the toolbar hamburger icon connects to the drawer. These are all practical skills that transfer directly to real-world Android projects.
5. Tabbed Activity Template – Organized Content View
What It Is
The Tabbed Activity template creates an app with horizontal tabs at the top of the screen. Users can tap a tab or swipe horizontally to move between sections.
Why Beginners Like This Template
It’s clean, visually organized, and immediately recognizable to users. Among the Android Studio project templates focused on navigation, Tabbed Activity is often the easiest to understand because the structure is straightforward — each tab corresponds to one Fragment, and swiping moves between them in order.
The template includes a ViewPager2 component for swipe navigation, a TabLayout for the visual tabs, and a FragmentStateAdapter that manages which Fragment loads for each tab. Seeing all of these working together is a good introduction to how Android handles multi-screen layouts.
Real-Life Example
A news app with Sports, Technology, and Health tabs. A learning app with Lessons, Notes, and Tests sections. A recipe app organized by meal type. Any content-heavy app that benefits from clear categorical organization is a natural fit for this template.
What You’ll Learn From It
How ViewPager2 and TabLayout work together. How a FragmentStateAdapter manages multiple screens. How swipe gestures connect to navigation. This template is a good step forward once you’re comfortable with basic layouts and Fragment concepts.
How to Choose the Right Android Studio Project Template
This decision trips up a lot of beginners — not because it’s actually complicated, but because it feels like it matters more than it does. Here’s a straightforward way to think about it.
If you’re completely new to Android development, start with Empty Activity. It teaches the fundamentals without hiding them behind generated code. Once that feels comfortable, move to Basic Activity for your next project to see how toolbar and FAB work.
When you’re ready to build something with multiple sections, choose between Bottom Navigation and Tabbed Activity based on your app’s structure. Bottom Navigation works best when sections are roughly equal in importance. Tabs work best when content is organized in a clear sequence or category system.
Use Navigation Drawer when your app has many sections — more than three or four — and you don’t want to crowd the bottom bar or top area with too many tabs.
The most important thing to remember: among all Android Studio project templates, there’s no permanently wrong choice. You can always create a new project. The goal is learning, not perfection.
Common Mistakes Beginners Make With Project Templates
Jumping to Complex Templates Too Early
It’s tempting to start with Bottom Navigation or Navigation Drawer because they look impressive. But if you don’t understand how a basic Activity and layout work yet, the generated code in those templates will confuse rather than help. Start simpler than you think you need to.
Ignoring the Code That Gets Generated
Every template generates code automatically — XML layouts, Kotlin files, resource files. A lot of beginners just start modifying things without reading what’s already there. Take fifteen minutes to read through the generated files. Understanding what the template built is half the learning value.
Changing Everything at Once
When you first open a template project, the urge to customize everything immediately is strong. Resist it. Change one thing, run the app, see what happened, then change the next thing. This approach catches errors early and builds genuine understanding of cause and effect.
Final Conclusion
Choosing the right starting point among Android Studio project templates makes a real difference in how quickly and clearly you understand Android development. The right template doesn’t do the learning for you — but it removes the setup friction that gets in the way of learning.
Start with Empty Activity and build your understanding from the ground up. Move to Basic Activity once that feels comfortable. When you’re ready for multi-screen apps, explore the navigation-based Android Studio project templates — Bottom Navigation, Navigation Drawer, or Tabbed Activity — based on what your app actually needs.
No template is a permanent commitment. The best one is simply the one that helps you learn the next thing without overwhelming you in the process. Keep building, keep reading the generated code, and keep moving forward — that’s how Android development actually becomes clear.