A lot of Android beginners spend weeks testing their apps exclusively on the emulator — not because it’s better, but because they assume connecting a real phone must be complicated. The truth is, once you know the steps, it takes about five minutes. And in 2026, the wireless debugging feature means you can connect Android phone to Android Studio without even needing a USB cable after the initial setup.
This guide walks through both methods clearly — the USB approach first because it’s the most reliable starting point, and wireless debugging second because it’s genuinely more convenient once it’s working. By the end, your actual Android phone will be running your apps directly from Android Studio.
Why You Should Test on a Real Device
Before getting into the steps, it’s worth understanding why this matters. Emulators are useful — they’re free, convenient, and let you test different screen sizes without owning multiple phones. But they have real, practical limitations that matter as soon as you build anything beyond a basic list app.
Camera features don’t work properly on emulators. Bluetooth, NFC, fingerprint authentication, real GPS behavior, and actual battery performance all behave differently on physical hardware. If your app uses any of these — or if you simply want to know what your users will actually experience — you need to connect Android phone to Android Studio and test on real hardware.
There’s a performance angle too. An emulator on an average laptop can feel sluggish in ways that hide actual app performance problems. Your phone shows you exactly what your users see.
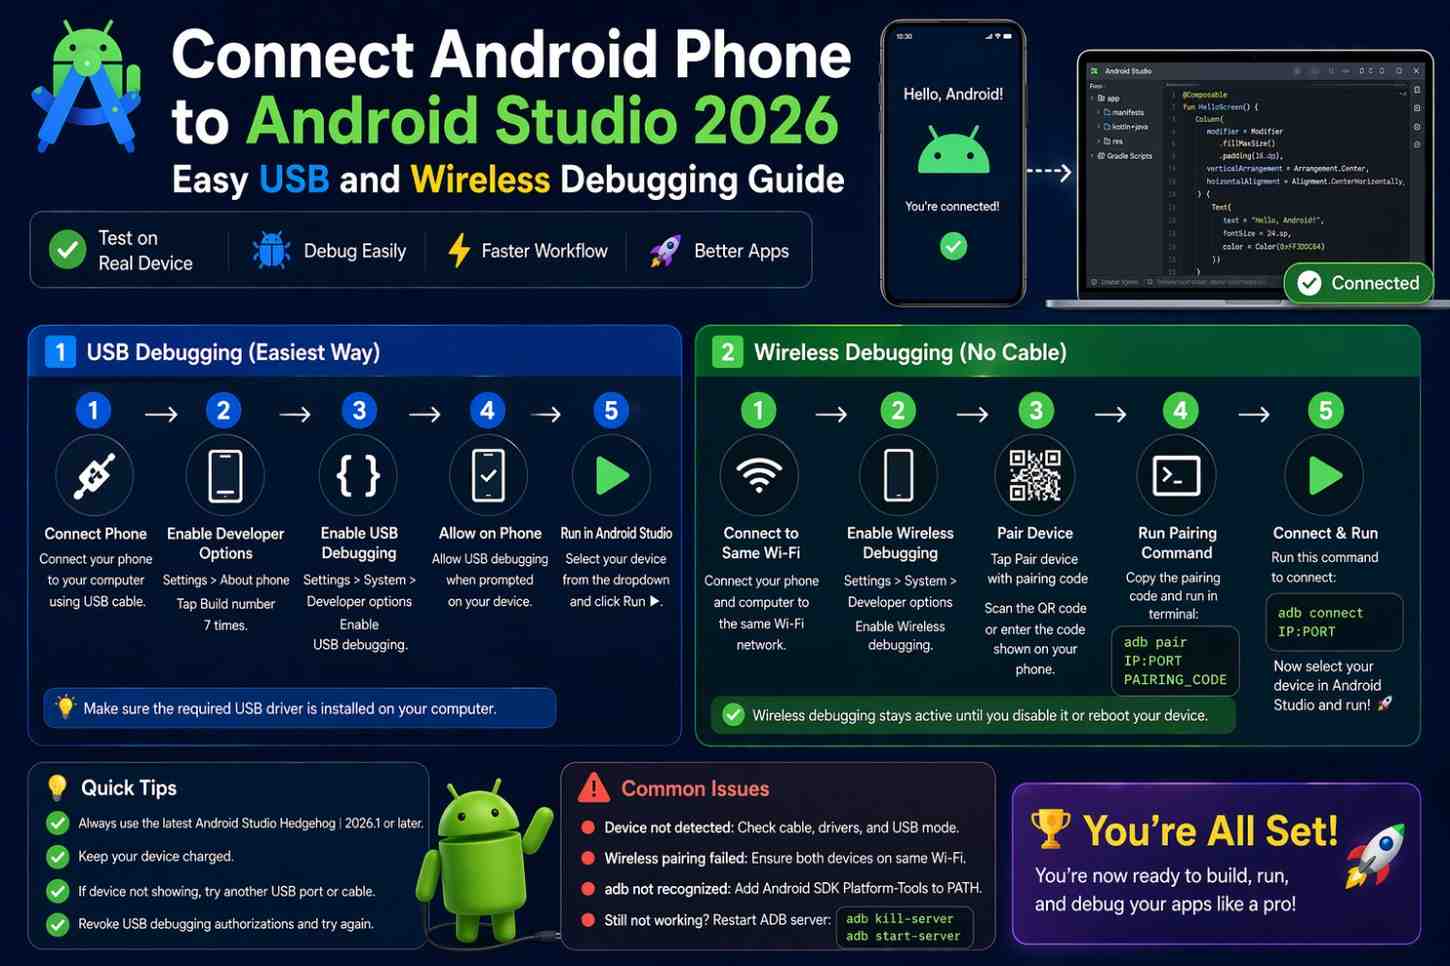
Step 1: Enable Developer Options on Your Android Phone
Before you can connect Android phone to Android Studio, your phone needs Developer Options enabled. This setting is hidden by default on every Android device — you have to unlock it manually.
Open Settings, scroll down to About Phone, and tap Build Number seven times in a row. After a few taps, you’ll feel a small vibration and see a message: “You are now a developer.”
On Samsung devices specifically, Build Number is usually inside About Phone → Software Information rather than directly in About Phone. If you’re having trouble finding it on any device, use the Settings search bar and type “Build Number” — it’ll appear regardless of where it’s nested.
Once enabled, go back to the main Settings screen. You’ll now see a Developer Options entry in the menu. Open it.
Step 2: Enable USB Debugging
Inside Developer Options, find USB Debugging and switch it on. A warning dialog will appear — tap OK to confirm.
USB Debugging is what allows Android Studio to actually communicate with your device. Without it, plugging in a USB cable only charges your phone — it can’t deploy apps, read logs, or interact with the IDE in any meaningful way.
While you’re here, scroll down and also locate Wireless Debugging. You don’t need to enable it right now, but you’ll be coming back to it shortly for the cable-free setup.
Step 3: Connect via USB
The Most Reliable Way to Connect Android Phone to Android Studio
Plug your phone into your computer using a USB cable. The very first time you do this with debugging enabled, your phone’s screen will show a dialog: “Allow USB debugging from this computer?”
Tap Allow. If you want to skip this confirmation in future sessions on the same computer, check Always allow from this computer before tapping Allow.
Open Android Studio. In the toolbar at the top, you’ll see a device selector dropdown. Your phone should appear there by name — something like “Pixel 8 (API 35)” or your specific device model. Select it and press Run. Your app will build, install, and launch directly on your phone.
If your phone doesn’t appear in the dropdown after connecting, check these things:
Use a data-capable cable. Charge-only cables are a very common culprit — they carry power but no data. Try a different cable if the device isn’t showing up.
Try a different USB port. Some ports, particularly on USB hubs, don’t reliably pass data through.
Install manufacturer drivers on Windows. Samsung, OnePlus, Xiaomi, and most other manufacturers have USB drivers available on their official support pages. Windows sometimes needs these to recognize the device properly. Mac and Linux generally don’t require additional drivers.
Check for the authorization dialog. If the device shows up as “unauthorized” in Android Studio, look at your phone screen — the allow/deny debugging dialog might be waiting for your response.
Step 4: Set Up Wireless Debugging
Connect Android Phone to Android Studio Without a Cable
This is the method worth learning in 2026. After a one-time pairing process, you can connect Android phone to Android Studio completely wirelessly — no cable needed — as long as your phone and computer are on the same Wi-Fi network.
First, ensure both devices are on the same Wi-Fi network. This is a hard requirement — wireless debugging only works on the same local network.
On your phone, go to Developer Options → Wireless Debugging and toggle it on. Then tap the Wireless Debugging text itself to open the sub-menu. You’ll see two pairing options: Pair device with QR code and Pair device with pairing code.
In Android Studio, go to Tools → Pair Devices Using Wi-Fi. A dialog opens showing a QR code alongside a manual pairing code option.
The QR code method is faster — select Pair device with QR code on your phone inside the Wireless Debugging menu, and scan the code shown in Android Studio. Pairing completes in a few seconds.
Once paired, your phone appears in the Android Studio device selector connected wirelessly. Unplug the USB cable. Your device stays available in the list as long as Wireless Debugging remains enabled on your phone and both devices stay on the same network.
Step 5: Running and Debugging Over Wi-Fi
With wireless debugging active, everything works exactly as it does over USB. Select your device from the dropdown, press Run, and the app deploys to your phone over Wi-Fi.
Logcat — the log viewer in Android Studio — also works wirelessly. Filter it by your app’s package name and you’ll see exactly what’s happening on your physical device in real time. This is especially useful for tracking crashes, network requests, and lifecycle events that are hard to reproduce on an emulator.
One practical heads-up: wireless debugging can sometimes drop the connection if your phone’s screen locks or goes to sleep. If your device disappears from the device list, go back to Developer Options on your phone, toggle Wireless Debugging off and back on. It reconnects in a few seconds — not a big deal once you know to expect it.
Troubleshooting Common Connection Problems
Device Not Showing Up After USB Connection
The most likely cause is a charge-only cable. Replace it with a known data cable and try again. If the device appears but shows “unauthorized”, check your phone screen — the debugging permission dialog is probably waiting for your input.
“Waiting for Target Device to Come Online”
This message usually means the app is trying to install but ADB — the Android Debug Bridge — is stuck. Restart it by going to Tools → Troubleshoot Device Connections inside Android Studio. Alternatively, open a terminal and run:
bash
adb kill-server
adb start-server
This restarts the ADB service and usually resolves the issue immediately.
Wireless Debug Connection Keeps Dropping
If wireless debugging disconnects repeatedly, the most likely cause is AP isolation on your router. Some routers — particularly on office, university, or public networks — block communication between devices connected to the same network. Switch to a home network or use a mobile hotspot, and the problem typically disappears.
App Installs But Crashes Immediately
This isn’t a connection issue — it’s a code problem. Check Logcat for the specific error message. A missing permission in the manifest, a null reference, or an uncaught exception are the most common culprits. The crash log in Logcat will tell you exactly where to look.
For detailed ADB troubleshooting beyond these common cases, the official Android Debug Bridge documentation covers every option and common error scenario.
A Note on Security When Using Developer Options
Once you connect Android phone to Android Studio regularly, Developer Options and USB Debugging will be part of your daily setup. A few things worth keeping in mind.
USB Debugging does reduce your phone’s security slightly when connected to an unknown computer. Only check “Always allow” for computers you personally own and trust. On a shared or public machine, always deny the request.
Some developers keep a separate, inexpensive Android device specifically for development and testing — an older Pixel or a budget mid-range phone works perfectly. This keeps their personal phone’s security unaffected while still giving them real hardware to test on. It’s a habit worth considering once you’re testing regularly.
You can also check how Android’s developer options affect device security on the official documentation page if you want a thorough understanding of what each setting actually does.
Final Conclusion
Learning to connect Android phone to Android Studio — whether via USB or wirelessly — is one of those setup steps that seems intimidating until you’ve actually done it once. Enable Developer Options, turn on USB or Wireless Debugging, complete the one-time pairing, and your real device becomes a permanent part of your development workflow.
The wireless debugging option available in 2026 makes this genuinely convenient — no cable dependency, no plugging and unplugging between sessions. Just open Android Studio, select your phone from the dropdown, and run. Testing on real hardware gives you a clearer, more honest picture of what your users actually experience — and that makes every app you build meaningfully better.